Page Contents:
Background
The “bridge” is part of our saddle. Specifically, it is the rope that connects our left and right ‘bridge loops’. It typically has a carabiner in the center and is used to connect us to our lifeline or tether. Although a bridge comes with our saddle, it is a replaceable and upgradeable component.
- Do not attempt any of these designs if you are not comfortable in tying the necessary knots and testing your bridge before you use it to climb.
- The designs on this page are applicable to saddles with a standard bridge loop on each side of the saddle. If your saddle does not match this description, which is the case with some 2 panel saddles, these designs are not applicable.
Redundant Bridges
JRB is an advocate of having 2 bridges on our saddle (a redundant bridge configuration). The longer/upper bridge is the primary/main bridge and the shorter/lower bridge is the backup/redundant bridge, used in rappel, and alternating anchor techniques such as hitch climbing. Whether the bridges are adjustable or fixed in length, it is important that the bridges are of different lengths at time of rappel, with at least 6″ of separation between the carabiners. This ensures that rappel can be executed without interference between the bridges.
Fixed Attachment on Both Sides
Some saddle hunters prefer a bridge which is “openable”, with a carabiner on one side allowing it to be detached. JRB does not use, nor recommend this type of configuration. Furthermore, for purposes of comfort, it is important that the connection between the bridge and the bridge loop is cinching (not floating) such that it stays in place, at an optimal location for comfort, typically in the middle of the bridge loop.
Adjustable Bridges
Although fixed length bridges can be used, JRB prefers adjustable bridges. Rationale:
- A long main bridge which can be lengthened fit over our head allows it to act as a set of suspenders for our saddle when walking.
- In SRT and DSRT climbing, a long main bridge puts our friction hitch up in a high position, making the climb much easier. But we might prefer our bridge shorter during the hunt.
- An adjustable bridge allows us to lengthen it to sit and shorten it to stand. Adjusting the bridge to sit (rather than changing our tether/lifeline attachment) reduces the hip pinch or hip squeezing effect of a saddle.
- A short bridge which can be made extremely short makes it easier to use in JRB Hitch Climbing and Stick Climbing. However, if we don’t plan on Hitch Climbing, the short bridge does not need to be adjustable.
Main Bridge Features
Although we can climb on the stock bridge which comes with our saddle, JRB prefers to upgrade to a bridge which has these features:
- Design is free of metal and does not use Amsteel.
- Can be lengthened to comfortably allow our head to pass under it, allowing the bridge to be used as suspenders. This ensures it is also long enough to be in the optimal position when executing SRT and DSRT climbing.
- Can be easily adjusted with one hand, even when climbing where there is no footing except a footloop.
- Has a compact friction hitch, allowing the bridge to be made as short as possible.
Redundant Bridge Features
In order to efficiently execute Hitch Climbing or Stick Climbing (without the use of a Lineman’s belt), we want a bridge which can be made ultimately compact, like a loose belt. Because the redundant bridge is infrequently adjusted, we do not need the same level of ease of adjustment as the main bridge. The abilith to make it compact is a more important feature.
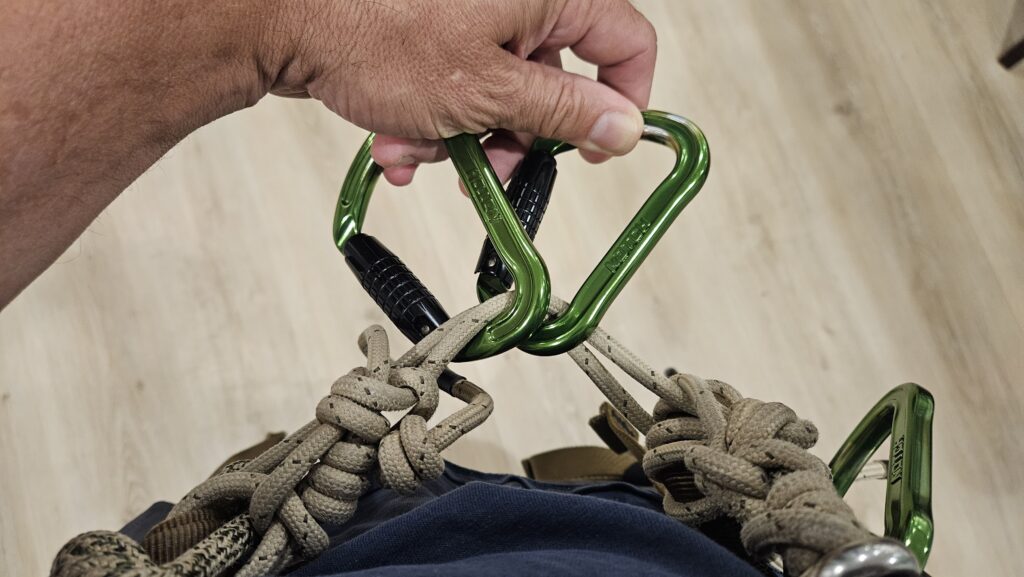
In order to rappel on the Munter Friction Hitch, we want a redundant bridge composed of two strands, such that we can orient our carabiner in a transverse fashion, as pictured below.
Components
Depending on the design chosen, the elements for building a bridge can be found on these pages:
The Carabiners page also includes information on Swivel Options. A Swivel is not mandatory but is especially useful in DSRT, ensuring that our carabiner will always be in a preferred position.
Current Bridge Designs
This section contains the designs that JRB is currently using and recommending.
2026 Bridge Design
The 2026 main bridge design uses the Formula Hitch, which has some advantages over prior designs:
- Because it loads two strands instead of two loops, it is easier to tie onto our bridge loop.
- It is more compact than a Longhorn Agile (and similar to a JRB Ascender).
- This design has a tender rather than a self tending hitch, which is easier to operate.
The lengths cited in the video are:
- 96″ (244 cm) of 8mm rope; Use 28″ (71 )cm for tying the fixed end
- 96″ (244 cm) of 6mm Sterling TRC; Make the ends 18.5 ( 47 cm) different in length before tying a 251 Formula Hitch.
- 84″ (214 cm) of 6.8mm Sterling TVAC
- 6″ (15 cm) of 1″ Tubular Webbing (2 pcs)
- 32″ = 81 cm for BHT. This amount may vary. A bigger stopper knot or a thicker bridge loop might require up to 36″ or more.
This is the left handed version of the video above:
Blakes Hitch Tensioner (BHT)
As covered above, the Blakes Hitch Tensioner Bridge is JRB’s preference for the 2nd/redundant bridge. It can be made extremely short and not be susceptible to the bridge carabiner unintentionally tending the friction hitch when moving. .
The optimal length of cord to construct it could vary based on the design of your saddle, given that your saddle might have longer or shorter bridge loops. It is best to use more cord for the first tie, and then adjust and retie it as appropriate. Consider the following length guidelines, but also consider:
- If the bridge loop is thicker, the working end may require an inch or two more length.
- If tying onto a carabiner, the working end may require an inch or two less length.
- If your saddle has bridge loops which are further apart, you might prefer more than the recommended cord length.
Specifying the perfect amount of cord to use and the perfect length for the working end is not possible given the different sizes of bridge loops on different saddles. Therefore, expect to tie it a couple of times. Here are some recommended cord lengths to get you ‘in the ballpark’:
- 6 mm cord: use 80-84″, 31-34″ working end
- 6.8 mm cord: use 84-88″, 32-35″ working end
- 7 mm cord: use 84-88″, 35-38″ working end
This is the left handed version of the video above:
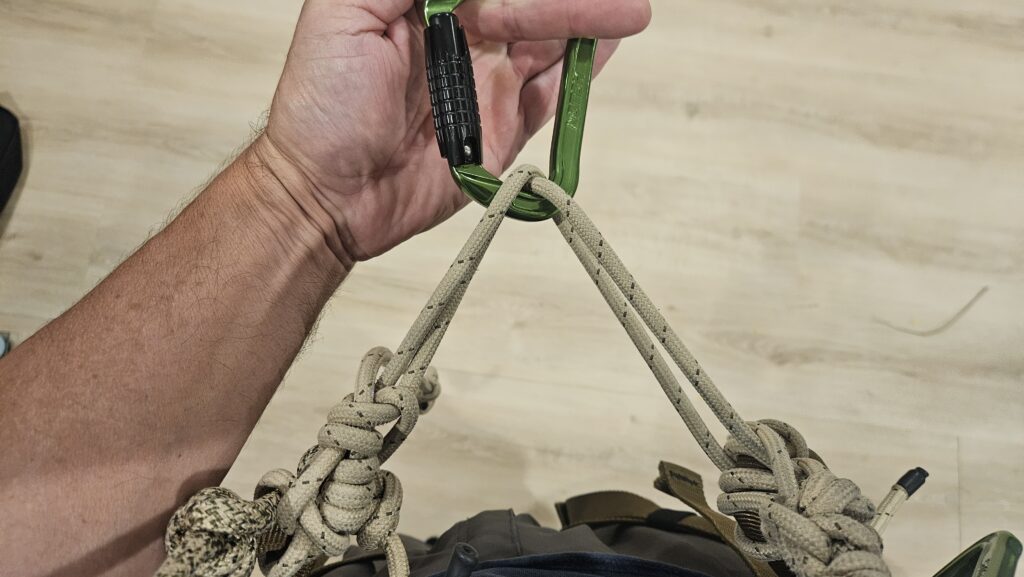
Viewed from the perspective of the climber, this photo shows how JRB keeps the BHT bridge normally, in a relatively short position, with the Carabiner set in transverse orientation, with the cords crossing inside of it, ready to accept the Best Friend loop or Munter friction hitch in both DSRT and SRT climbing. In order to ensure no interference during rappel, the long bridge must always be at least 6″ longer than the short bridge, even longer if using Rappel Device other than the Munter Friction Hitch.
When Hitch Climbing or Stick Climbing, because of the ability to get the BHT bridge so compact, JRB prefers to use the it as the primary bridge (until the final position is reached). It is drawn very short, allowing greater stability during the climb. The carabiners capture both strands of the bridge. When engaging the friction hitch with the carabiner, also engage the rope itself.
Simple Redundant Bridge Options
If we are not hitch climbing, or if something less elaborate or not adjustable is preferred for a redundant bridge, in the video below, JRB outlines 10 device options that can be used in multiple configurations to construct a permanent or improvised redundant / backup bridge.
A 24 inch (60cm) sling (runner) with a girth hitch on one bridge loop and a carabiner on the other makes a solid Bridge for impromptu or emergency use. The concept was also demonstrated in the following video: Self Rescue After Loss of Footing. The slings on the following page can be used to make an impromptu bridge.
Historical Bridge Designs
The sections below document the other bridge designs that JRB has introduced. Many of these designs are in use and are included here for historical reference.
Main Bridge Design, 2025 (JRB Ascender)
In 2025, JRB released a bridge design based on the Compact, Non-Jamming JRB Ascender Hitch. It is long enough to go over our head and act as suspenders. The addition of the clove hitch ensures that it stays in place on our bridge loops (better than the “Double Adjustable Bridge” shown below). The friction hitch is optimally compact (and notably smaller than the Longhorn Agile Bridge shown below). The design uses:
- 8′ of 8mm rope (your height + 2′)
- 6′ of 6mm Sterling TRC cord, and 36″ working end
- If using 9-9.5 mm rope, use 78″ of cord and 38″ working end.
Longhorn Agile Bridge (2024)
The Longhorn Agile Hitch can be used in an adjustable bridge. It performs great, but is larger/longer than ideal. (This is the primary reason that JRB went back to the JRB Ascender in 2025).
The length of the rope used for the bridge should be approximately your height plus 2 feet. The amount of cord needed depends on the diameters:
- For 6mm cord on 8mm rope, use 96″ of cord, with 12″ ends to start the Longhorn.
- For 7mm cord on 9.5mm rope, use 120″ of cord, with 14″ ends to start the Longhorn.
BHT, prior versions
This is the 2025 version of the Blakes Hitch Tensioner, replaced by version 3 in 2026. JRB’s preferred lengths:
- 7 mm cord: use 84-88″, w/37″ working end
- 6 mm cord: use 80-84″, w/33″ working end
- 6.8 mm cord: use 84-88′, w/35″ working end
For reference, below is the ORIGINAL design for the Blakes Hitch Tensioner Bridge, introduced in 2024. It remains viable, but v2 (described above) is easier to tend. This design used:
- 6mm cord: 32″ working end
- 7mm cord: 33.5″ working end
- 8mm cord: 35″ working end
For reference, this is the predecessor video detailing the Blake’s Hitch Tensioner, which used a 32″ working end on 7mm cord.
Double Adjustable Bridge (2023)
This is the 2023 design for a double bridge, which utilized the JRB Ascender Hitch. Use a length of rope that is approximately double your height (approximately 12 feet), and two 72″ lengths of cord.
Non-mechanical, adjustable bridge (2022)
In 2022, JRB introduced this design, using, 9 ft or 108 in or 274 cm of 7mm cord to construct it. In practice, most climbers keep one bridge shorter than the other and the short one is constructed with 7ft (213 cm). 24″ (61cm) is used as the working end when starting the Blakes Hitch. This bridge does not cinch in place on the bridge loops and for that reason, it was replaced with newer designs.
The Original Redundant Bridge (2020)
This video shows JRB’s initial concept for a simple, non-adjustable, 2nd (short) bridge. The design uses 4 ft (122 cm) of cord, closed into a fixed loop with a hunters bend, capturing both bridge loops. The Hunter’s Bend can be untied and adjusted as necessary so as to ensure that the short bridge is adequately shorter than the long bridge. If a more secure bend is desired, consider using 6 ft (183 cm) and a sliding triple fisherman’s bend (video available), and consider a carabiner on the end, ensuring it is removeable and can be untied. Get the length set, then trim the ends as appropriate.